Microsoft Access |
Introduction into Microsoft Access
Starting Microsoft Access
Creating New, and Opening Existing Databases
Tables - Video
Forms - Video
Report - Video
Office Links - Video
Queries - Video
Microsoft Access is a powerful program to create and manage your databases.
First of all you need to understand how Microsoft Access breaks down a database. Some keywords involved in this process are: Database File, Table, Record, Field, Data-type. Here is the Hierarchy that Microsoft Access uses in breaking down a database.Database File: This is your main file that encompasses the entire database and that is saved to your hard-drive.
Example) StudentDatabase.mdbTable:A table is a collection of data about a specific topic. There can be multiple tables in a database.
Example #1) Students
Example #2) TeachersField:Fields are the different categories within a Table. Tables usually contain multiple fields.
Example #1) Student LastName
Example #2) Student FirstNameDatatypes:Datatypes are the properties of each field. A field only has 1 datatype.
FieldName) Student LastName
Datatype) TextQueries (questions): Using Access, it is easy to ask complex questions concerning the data in the database and receive instant answers.
Forms: In Access, you can produce attractive and useful forms for viewing and updating data.
Reports: Access contains a feature to create sophisticated reports easily for presenting your data.
Double click on the Microsoft Access icon on the desktop or Click on Start >> Programs >> Microsoft Access
When Microsoft Access first starts up, a dialog box is automatically displayed with options to create a new database or open an existing one. If this dialog box is displayed, click Blank Access Database, and then click OK.
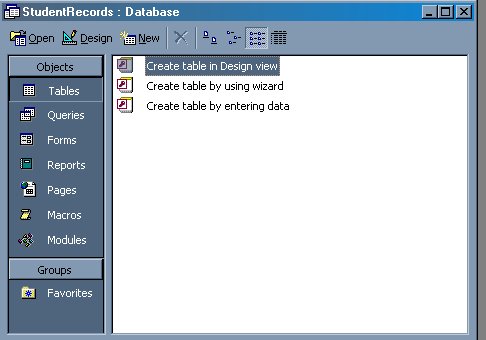
If you have already opened a database or closed the dialog box that displays when Microsoft Access starts up, click New Database on the toolbar, and then double-click the Blank Database icon on the General tab.Specify a name and location for the database and click Create. (Below is the screen that shows up following this step)
Tables
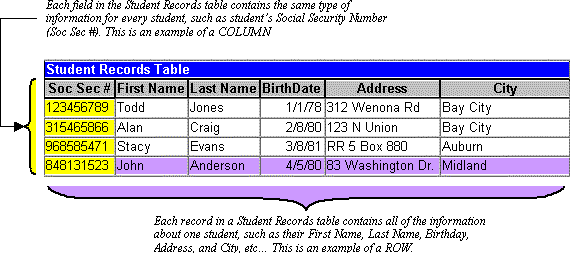
A table is a collection of data about a specific topic, such as students or contacts. Using a separate table for each topic means that you store that data only once, which makes your database more efficient, and reduces data-entry errors. Tables organize data into columns (called fields) and rows (called records)
Create a Table from scratch in Design viewIf you haven't already done so, switch to the Database Window. You can press F11 to switch to the Database window from any other window.

Double-Click on "Create table in Design view".
(DESIGN VIEW)
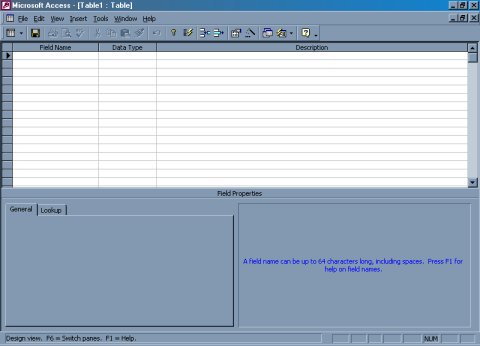
Define each of the fields in your table.
- Under the Field Name column, enter the categories of your table.
- Under Data Type column, enter the type you want for you categories.
- The attribute of a variable or field that determines what kind of data it can hold. For example, in a Microsoft Access database, the Text and Memo field data types allow the field to store either text or numbers, but the Number data type will allow the field to store numbers only. Number data type fields store numerical data that will be used in mathematical calculations. Use the Currency data type to display or calculate currency values. Other data types are Date/Time, Yes/No, Auto Number, and OLE object (Picture).
- Under the Description column, enter the text that describes what you field is. (This field is optional).
Step One - Create a new database
- Click on File >> New
- Go to right hand side task pane and click Blank Database
- Save in your directory Access folder as Vending Services
- Double click on Create Table in Design View and add the information below then save and close.

Primary Key One or more fields (columns) whose value or values uniquely identify each record in a table. A primary key does not allow Null values and must always have a unique value. A primary key is used to relate a table to foreign keys in other tables. NOTE: You do not have to define a primary key, but it's usually a good idea. If you don't define a primary key, Microsoft Access asks you if you would like to create one when you save the table.
For our tutorial, make the Customer # field the primary key, meaning that every student has a social security number and no 2 are the same.
To do this, simply select the Customer # field and select the primary key button
After you do this, Save the table
Switching ViewsTo switch views form the datasheet (spreadsheet view) and the design view, simply click the button in the top-left hand corner of the Access program.
Datasheet View Design View
Displays the view, which allows you to enter raw data into your database table.
Displays the view, which allows you to enter fields, data-types, and descriptions into your database table.
Step Two: Adding records to a Table
- Entering Data Click on the Datasheet View enter the data into each field. NOTE: Before starting a new record, the Customer Number # field must have something in it, because it is the Primary Key. If you did not set a Primary Key then it is OK.

2. Click on the Save icon and then click yes. Save your table as Customer.
Manipulating Data
Adding a new row - Simply drop down to a new line and enter the informationUpdating a record - Simply select the record and field you want to update, and change its data with what you want
Deleting a record - Simply select the entire row and hit the Delete Key on the keyboard
Step Two: Adding records to a Table
- Add the following additional records:
BA95 | Bayside Hotel | 287 Riley | Hansen | FL | 38513 | $21,876.00 | $892.50 | 30
BR46 | Baldwin-Reed | 267 Howard | Fernwood | FL | 37023 | $26,512.00 | $2,672.00 | 60Show Your Customer Table to Instructor
Printing Table
- Right click on Customer table >> Print Preview
- Put your pointer pointing at the top border, right click and select page setup
- Make any changes you would like. For example, Landscape so you can see the entire table.
Step One - Create a new Table within the Vending Services Database
- Add this structure for your table: (These are your headings for the table)
Assigning a field a specific set of characters
Switch to Design View >>Select the field you want to alter at the bottom select the General Tab
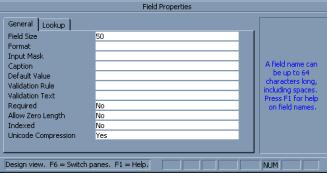
Select Field Size >> Enter the number of characters you want this field to have
Step Two - Entering Information in Table
1. Enter the following information in the Drivers Table
30 | Tuttle | Larry | 7325 Hickory | Eaton Springs | FL | 37891 | $16.00 | $21,145.25
60 | Powers | Frand | 57 Ravenwood | Fillmore | FL | 37572 | $15.00 | $19,893.50
75 | Temple |Shirley | 341 Pierce | Douglas | FL | 37613 | $17.00 | $23,417.002. Save your Driver Table
Show Your Driver Table to Instructor
A form is nothing more than a graphical representation of a table. You can add, update, delete records in your table by using a form. NOTE: Although a form can be named different from a table, they both still manipulate the same information and the same exact data. Hence, if you change a record in a form, it will be changed in the table also.
A form is very good to use when you have numerous fields in a table. This way you can see all the fields in one screen, whereas if you were in the table view (datasheet) you would have to keep scrolling to get the field you desire.Step One - Creating a form
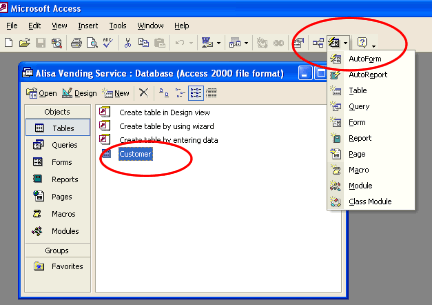
1. With your Vending Services Database open, click once on Customer
2. In the upper right corner, click on the down arrow of New Object and click on Autoform.
3. Congratulations, you created a form.
4. Save the form by clicking on the close button. When it asks if you want to save, click Yes. Now you have 2 tables and 1 form.Show Your Customer Form to Instructor
A report is an effective way to present your data in a printed format. Because you have control over the size and appearance of everything on a report, you can display the information the way you want to see it.
- Open your Vending Database
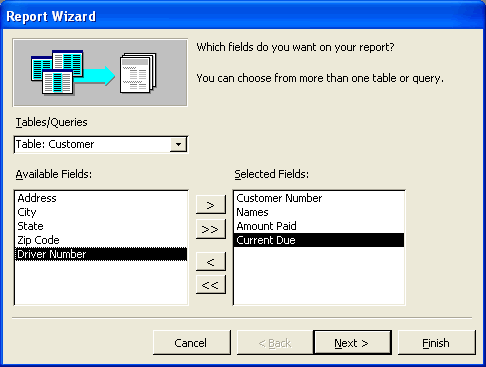
- Click on Report in the Objects bar then double click on Create a Report using a Wizard.
- Make sure you have your Customer Table in the first box.
- Double click on each of the available fields to move to box on right.
- Continue to click next to make different selections.
- Continue through the wizard chosing your favorite layout.
- Right click on the report >> click Print
Step One - Creating the Report
Step Two - Printing the Report
Show Your Customer Report to Instructor
Step One - Creating a Query 1
- Click on 'Queries" in the Objects column
2. Double-click "create Query in Design view"
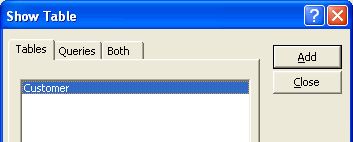
3. Click "Add" the table Customer
4. Click "Close" to close the window
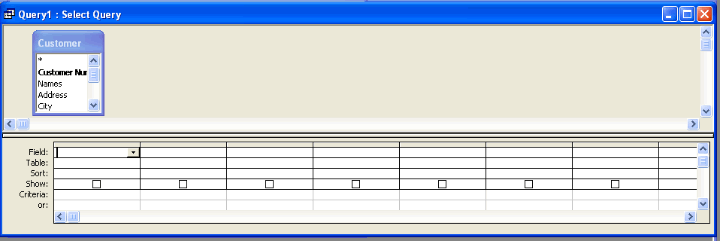
5. Now you have the view below
6. In the smaller box, double click "Customer Number", "Name", and "Driver Number".
7. Notice how the headings appear down below.(You can also click on the "field" to get the same information.)
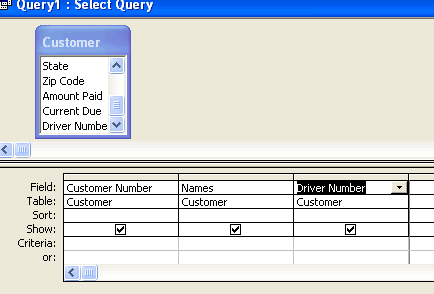
8. Then, click the "Run" button
in the toolbar at the top of your screen.
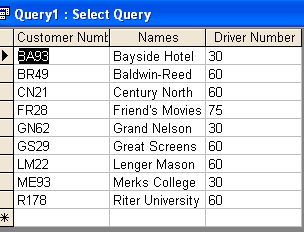
9. There is your first Query. Congratulations!
10. Click the save icon or X out and save your query as "Query 1".
Step Two - Creating Query 2 (a customer query)
- Click on 'Queries" in the Objects column
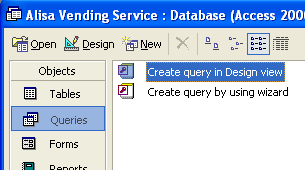
2. Double-click "create Query in Design view"
3. Click "Add" the table Customer
4. Click "Close" to close the window
5. Now you have the view below
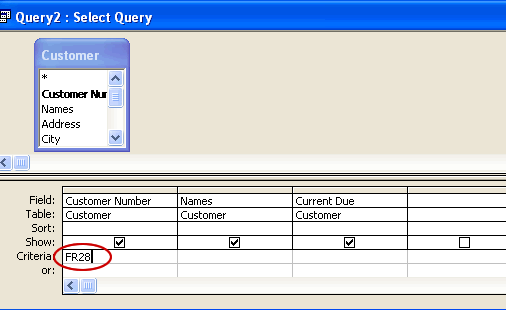
6. In the smaller box, double click "Customer Number", "Name", and "Current Due ".
7. Notice how the headings appear down below.
8. In the Criteria section, type FR28 under "Customer Number".
9. Then, click the "Run" button
in the toolbar at the top of your screen.
10. There is your second Query. Congratulations!
11. Click the save icon or X out and save your query as "Query 2 ".
Step Two - Creating Query 3 (a customer query)
- Click on 'Queries" in the Objects column
2. Double-click "create Query in Design view"
3. Click "Add" the table Customer
4. Click "Close" to close the window
5. Now you have the view below
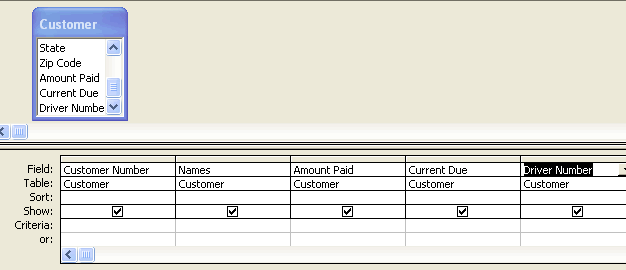
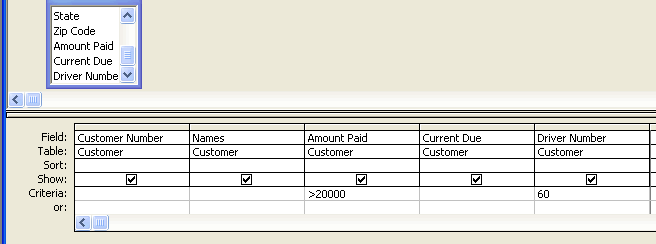
6. In the smaller box, double click "Customer Number", "Name", "Amount Paid ", "Current Due" and "Driver Number" .
7. Notice how the headings appear down below.
8. In the Criteria section for Amount Paid, key ">20000" and in the Driver Number, key in "60". The results will show all drivers with a number of 60 that have paid more than $20,000.00.
9. Then, click the "Run" button
in the toolbar at the top of your screen.
10. There is your third Query. Congratulations!
11. Click the save icon or X out and save your query as "Query 3 ".Show Your Customer Queries to Your Instructor
